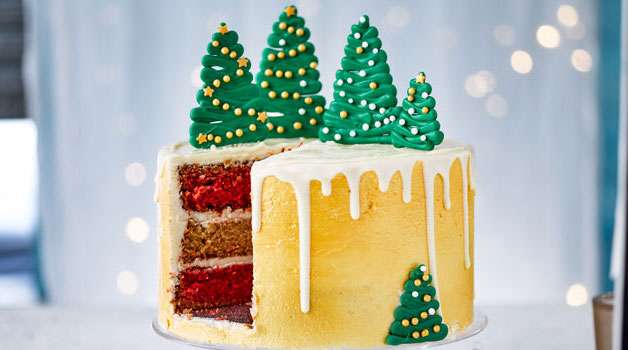
Cut into this stunning cake to reveal gold layers of vanilla and spice sponges. Top with our chocolate Christmas trees or try candy canes or chocolate snowflakes.
Prep: 1 hr
Cook: 30 mins
Difficulty: Medium
Serves: 20
INGREDIENTS
For the Sponge
225ml vegetable oil, plus extra for the tin
375g plain flour
3 tsp baking powder
1½ tsp bicarbonate of soda
375g golden caster sugar
1½ tsp mixed spice
½ tsp fine salt
300ml buttermilk
1½ tsp vanilla extract
3 large eggs
5ml red food colouring gel, we used Dr Oetker (liquid colouring will fade during baking) (optional)
For the Icing
250g pack slightly salted butter, at room temperature
900g icing sugar
1 tsp vanilla extract
500g tub full-fat soft cheese
edible gold spray (optional)
For the chocolate trees
75g white chocolate
green food colouring gel (optional)
sprinkles
For the chocolate drip
200g white chocolate, chopped or grated
METHOD
- Heat oven to 180C/160C fan/gas 4. Oil and line the base and sides of three 20cm cake tins with baking parchment – if your cake tins are quite shallow, line the sides to a depth of at least 5cm.
- Mix the flour, baking powder, bicarbonate of soda, sugar, mixed spice and salt in a bowl.
- Whisk the buttermilk, oil, vanilla extract and 75ml water with the eggs until smooth. Pour the wet ingredients into the dry and whisk until well combined. Scoop about a third of the cake mixture into a tin. If using, mix the food colouring into the remaining batter and divide this between the other tins. Bake for 25-30 mins, or until the cakes have risen and a skewer inserted into the centre comes out clean.
- Cool in the tins for 10 mins, then turn out onto a wire rack, peel off the parchment and cool. The sponges will keep, wrapped tightly in cling film, for three days, or wrap and freeze for up to two months.
- Beat the butter with half the icing sugar and vanilla until smooth. Add the remaining icing sugar and the cream cheese, and beat again until combined – don’t over-mix or the icing may become runny.
- Put one of the red sponges on a cake stand or cake board, sticking it down with a small blob of icing. Sandwich with the gold sponge, being generous with the icing. Top with more icing and the final red sponge, flat-side up. When assembled, use a palette knife to cover the entire cake with a thin layer of the icing, filling any gaps between sponges, but don’t worry about completely covering the sponges at this stage. This is called a crumb coat and ensures that your final layer is crumb-free. Make space in the fridge and chill for 30 mins to allow the icing to firm up.
- Melt the white chocolate in the microwave, or in a small bowl over a pan of simmering water. Stir in a spot of green food colouring gel if you want to make them green. Transfer to a piping bag and leave to firm up for a few mins (this will make the trees thicker). Line a baking sheet with parchment.
- Snip off the end of the piping bag and quickly pipe the chocolate backwards and forwards in thin lines to create little Christmas trees (ours were 7-10cm tall).
- Decorate with sprinkles and chill until you’re ready to decorate the cake.
- Once the crumb coat is chilled, use the remaining icing to completely cover the cake. This is easiest if you pile the icing on top of the cake, then use a palette knife to ease it over the edge and down the sides. You can make it as smooth or as rough as you like. Chill for another 30 mins.
- Meanwhile, for the chocolate drip, melt the white chocolate in a bowl set over a pan of lightly simmering water or in the microwave in short bursts. Pour into a disposable piping bag and set aside to firm up a little – you want it to be pourable but not too runny.
- Remove the cake from the fridge. If you like, you can use an edible gold spray to cover the surface in a thin layer of shimmer. When the white chocolate is the correct consistency, snip off the end of the piping bag and pipe drizzles down the side of the cake. Fill in the top with the remaining chocolate. Push them into the white chocolate topping before it sets.
Recipe from bbcgoodfood.com


